Install the plugin
To add the plugin to GeoNetwork Enterprise:
Stop the application
Download the latest patch version of the plugin from our Nexus repository. If you run a GeoNetwork Enterprise 2022.0, download the latest patch version related, for example gne-2022.0-md-push.zip.
Unzip the package.
Copy the jar file provided to
$CATALINA_BASE/webapps/geonetwork/WEB-INF/lib.Copy the content of the folder
schema_pluginsto[SCHEMA_Folder].Restart the GeoNetwork Enterprise
Configure the plugin. See next section.
Configuration
You first have to go to and enable the Metadata push mechanism to activate this feature, configuring the following fields:
Push server end-point: GeoNetwork end-points to connect to the remote server to push the metadata.
Your push server username and Your push server password: credentials to connect to the remote server.
Open licenses is a list of open licenses separated by the char |, used to identify the metadata to push.
Import xslt is the name of the XSLT style sheet (without the .xsl extension) that the remote server will apply to the metadata on import. It can be empty if no transformation is required. The transformation must exist in
xsl/conversion/importfolder inside the WAR.Supported metadata schemas is a list of metadata schema identifiers separated by the char | that are supported.
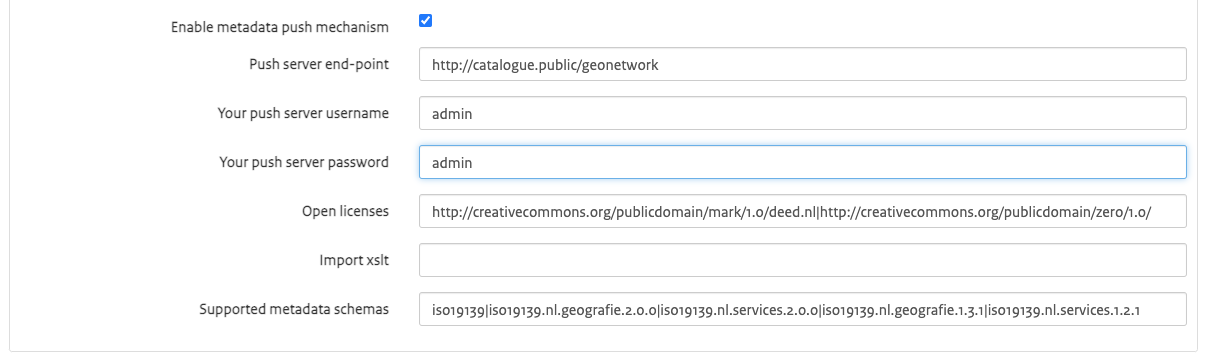
An example:
Push server end-point:
https://catalogue.public/geonetworkYour push server username:
adminYour push server password:
adminOpen licenses:
http://creativecommons.org/publicdomain/mark/1.0/deed.nl|http://creativecommons.org/publicdomain/zero/1.0/Import xslt:
md-publicSupported metadata schemas:
iso19139|iso19139.nl.geografie.2.0.0|iso19139.nl.services.2.0.0|iso19139.nl.geografie.1.3.1|iso19139.nl.services.1.2.1